Art, Craft, Life

Courage?

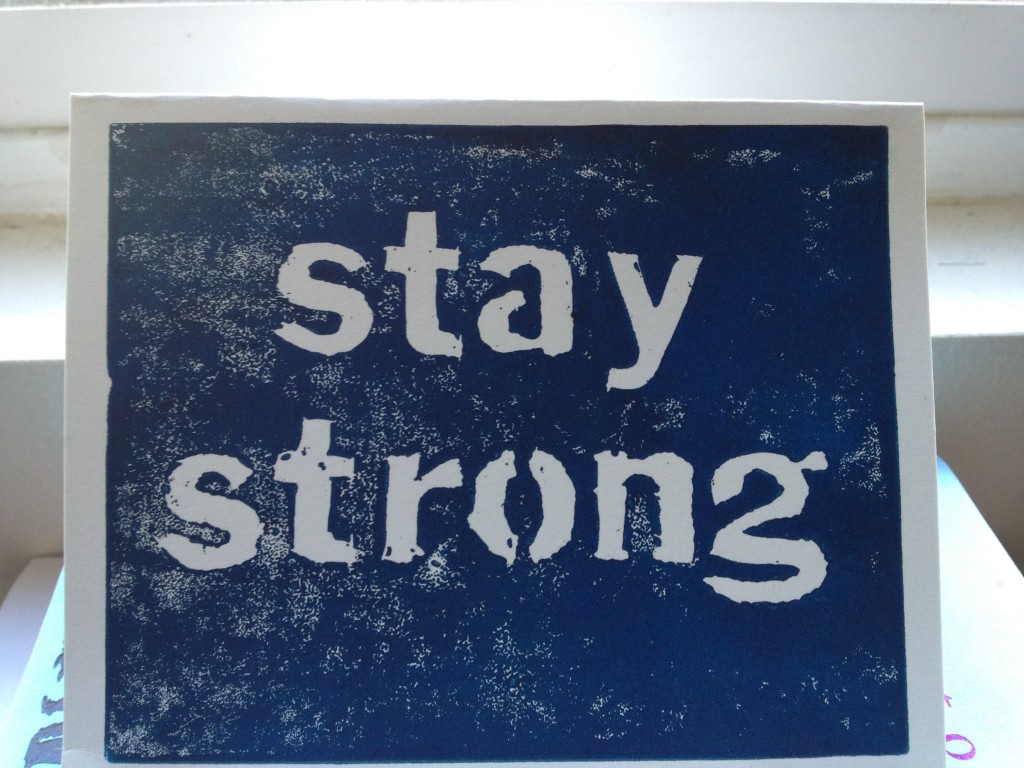
This is my latest linocut. Because we all need a little encouragement…  

I’ve never thought of myself as particularly courageous, but lately people keep telling me that I am so brave. I’m pretty self deprecating, so my knee jerk reflex has been to say “No! I’m really not. I’m just doing what I have to do. You have no idea what I’m going through right now, I’m just muddling through and making it up as I go along.” Then somebody mentioned this quote to me:

“Courage is not the absence of fear, but rather the judgment that something else is more important than fear.” — Ambrose Redmoon

Hunh… It stuck with me, and after a while I realized that ok, this comment, hokey as it sounds every time I hear it is in a way true. I am scared, yes, but figuring things out so that I can live the life that I want is way more important than being scared.

In my mind I imagined holding the word “brave” in my hands, and rolling it into prickly ball of letters, then pressing the jumble against my chest until they passed through to my heart and became a part of me. I’ve been trying out this new identity for the past week or so-this brave person- and I like it.

It got me wondering why I am so quick to brush things off when people say nice things about me, quick to add a qualifier, quick to say “Well it’s complicated.” Also, if people are right about this, what other obvious truths have I been missing out on?

The next time someone says something nice to you about yourself, why not skip the self deprecation and just say thank you? Why not just believe it? You are beautiful. You are capable. You are lovable. You are going to figure it all out. Things are going to be ok, really. Things are gonna be great.


Art, Craft

Linoleum Block Printing- Part 3

My friends decided to do a craft night at my house- my knitting is pretty much dead right now, so I chose to work on my block printing. We had a nice spread of munchies to keep us fortified- red cabbage, miso dip, cheese, meat, bread and soup.

So I’d agreed to help my friend Michelle  make some printed napkins. After a bit of research I’d heard that screenprinting ink was the way to go with block printing on fabrics. Oh lord. IT WAS NOT PRETTY.

I put some ink in my tray, and the brayer (rolley thing) wouldn’t move! Even worse, once I got the ink on the block, it crept into all of the crevices of my linoleum block. It just wasn’t tacky enough. What a waste of time. Since I’d already bought so much ink, I decided that the only way to use this stuff would be to make some stencils. I dug the packaging of my March Birchbox out of the recycling, and cut up a simple “EAT” out of the cardboard. Then I tried printing it with the brayer onto a random pair of boxer shorts that came from my house’s “bicycle rags” pile. ALSO- not pretty. The transfer was so-so. So I think the moral of the story is don’t use a plastic brayer for fabric ink. With a fluffy brayer you might get a decent effect.

Feeling desperate, I raided my makeup case. I found a Bare Minerals Baby Buki brush, took a deep breath, and proceeded to slather the brush in the ink. The results were okay but didn’t merit a photo, even though the image of “EAT EAT EAT” all over a pair of boxers was pretty funny.

I think my next course of attack will be to try a proper paintbrush with my stencil, or a brayer from a paintshop.

Oh well. Since that was a bust, I moved on to finishing my latest linoleum cut.

I finished up my cat print. I really like how it turned out. I cut this print on unmounted linoleum, and the process and the printing were very different than with my first print (on a mounted block). Basically, the unmounted linoleum I purchased (Speedball) was a little bit softer, thus easier to carve  and good for prints like this with lots of negative space.

The unmounted linoleum was also cheaper, and takes up much less physical space in your home than the blocks.

There were a few major disadvantages to this format. The linoleum would scrunch up sometimes if you were too aggressive with your carving. Also, printing was harder with the unmounted lino. Since it’s not as deep you are more likely to have mistakes with your printing (edges of the paper touching the messy workspace, etc). The softer linoleum seemed to shake out in little clumps and sabotage my printing. Also, when you wash off your ink, the unmounted linoleum really seems to suck up water and warp. I wouldn’t want to do anything really intricate on this stuff. It doesn’t feel like it will last.

I liked the golden yellow ink that I was using so much that I printed out a few copies of “Diving for love.” The lighting is a bit dark because I didn’t want to kill the mood of craft night, but geez this goldenrod is so beautiful. Just trust me.

All in all the night was a success. Everyone made progress on their projects. Now I wonder what to print next? I may move on to working with rubber. I’d like to make a stamp for my etsy shop, if I can ever think of a name for it. 🙂

Art, Craft

Linoleum Block Printing- Pt. 2

I am so bad at following up on craft posts, but this time I actually finished a project :). It helped that I had Jillian to coach me through the process. My cards turned out well and I ended up passing them out on Valentine’s Day.

Carving

When we last left my linocut, I’d drawn my print and transferred the image over to my linoleum block, with the help of my trusty spoon. Then came the fun part: carving out the negative space! Here it is in progress:

Printing

The ink that came with my kit is water-based, which meant easy cleanup. Surprisingly, the ink felt tacky and took a bit of work to smooth out.

Here’s an inked up block. Also very tricky: applying just the right amount. When you apply the right amount of ink to the tray and to the block, you get just the faintest wet gleam.

For printing, there are specialty tools, but I went back to my trusty spoon!

Results:

This is what happens when you use too little ink. If you happen to use too much ink all the crevices fill up and you won’t be able to see anything.

Here’s a print that’s more successful.

When I finally got my method down, things went like gangbusters! Here are my cards drying on my kitchen table.

For my next linoleum block I wanted to do text, but honestly I got bored with carving out so much blank space that I scrapped it.

Possible next linoleum block subjects:

  • Bismarck
  • Cup of tea
  • Sea creature
  • A state
  • Business cards


Art, Craft

Linoleum Block Printing- Part I

First, a quick note: I decided to take down the last handful of soul searching posts, and a few here and there from the past. I try to be honest about the good and bad times of my life, but it was really annoying me that the sad times were just sitting there in a lump, like the clammy Denver airport burrito of my blog. So I set them to private for now, until I figure out what I want to do with them. Life is good in many respects, I’m just really really emo about everything that isn’t. Ok, onwards…

——————————-

What was I going to say? Oh yes, something about printing. I played around with Jill’s linoleum printing kit over the holidays in Little Rock, and found the process quite fascinating. It’s a craft, to be sure.

Jill was kind enough to gift me with my own block printing kit, and I’ve taken a few days to think of what I’d like to make. Something that could be a card, I was thinking. Today it hit me- I wanted to do a deep-sea diving suit. I’ve always thought that they were quite beautiful, and there’s so much going on mechanically that you could give a sketch of one as much or as little detail as you like. Plus there’s that wonderful song by the Magnetic Fields.

20120201-224237.jpg

There were so many Google images of the suits online, but I was really drawn to the suits with the distinctive four openings around the head, with metal gratings. Also the brass looks so amazing against the soft and slouchy canvas, or whatever the heck the body is made out of.

Anyways, I drew a couple of sketches of different suits, but finally decided to go with this look. It’s low on details, but the simpler the better for my first time I think. I then went into overdrive with the pencil, so that I could make a good transfer to the linoleum.

Rubbing the paper onto the block with a spoon got some of the drawing over, but it was rather inadequate. I had to trace over and redraw quite a bit right onto the block.

20120201-224330.jpg

So the way that this works is- whatever I carve away will be white. I’m basically carving out a stamp. I’m still wrapping my head around the positive/negative space, and what I’d like the finished product to look like. All that said I think I will probably try to carve the black parts out, for simplicity’s sake. Doing the inverse seems very technically tricky.

I’ll definitely update once I start carving, but so far I’m pleased with the process.

Craft

Terrarium Terror

So I like to knit. I can do very basic bicycle maintenance. I’ve made beer. I’ve roasted coffee. And now,  thanks to a generous gift of a WorkshopSF class, I can add “terrariums” to my list of hipsterific craft skills.

Behold! My first terrarium!

It’s got a little bit of this, a little bit of that. Basically during my class I grabbed every single plant that I thought was pretty and stuffed them in a jar.

Here is our hero, trapped in a self contained ecosystem. He is searching for the Golden Eggplant. What?

Yes! The Golden Eggplant! It holds the secrets to good digestion.

Emboldened by my success and the great fun I had piecing together my first terrarium, I decided to grab materials and make a couple more, with one going toward my office’s White Elephant event.

Gathering supplies was pretty easy- I picked up some jars from a thrift store, then got soil, charcoal, pebbles, plants and moss at the plant shop. Pretty straightforward.

Ta-da.

I’m really into the black lichen stuff.The giraffe came from a cocktail I had at Luna Park. I have a whole bowlful of little cocktail critters.


Then I wrote up a few care instructions and attached it to the vase with a piece of sock yarn. I hope this thing is a hit!